How to Import Bank Transactions into QuickBooks Online (CSV, QBO)
Step-by-step: format a bank CSV for QuickBooks Online, upload it, map the columns and avoid the errors that stop imports.
Bank feeds are the easiest way to get transactions into QuickBooks Online — until they stop working. A bank changes its login system, a connection expires, or you need transactions from before the account was connected. When that happens, uploading a file is the reliable fallback. This guide covers the whole process, from downloading the right file to reviewing the imported transactions.
What you'll need
- Access to your online banking, to download transactions.
- A QuickBooks Online login with permission to manage bank transactions.
- About ten minutes for the first import, and two or three minutes after that.
Step 1: Download transactions from your bank
Sign in to online banking and open the account. Look for an option called Download, Export, Download transactions or Download account activity. Most banks offer some of these formats:
- QBO or "QuickBooks Web Connect" — the best option if your bank offers it. You can upload it to QuickBooks directly and skip to step 3.
- CSV or "Spreadsheet" — works, but usually needs reformatting first (step 2).
- OFX, QFX or "Quicken" — can be converted to QBO in seconds.
- PDF statement only — use a PDF statement converter to extract the transactions.
Choose a date range that starts the day after the last transaction already in QuickBooks. Importing overlapping dates is the most common cause of duplicates.
Step 2: Get the file into QuickBooks format
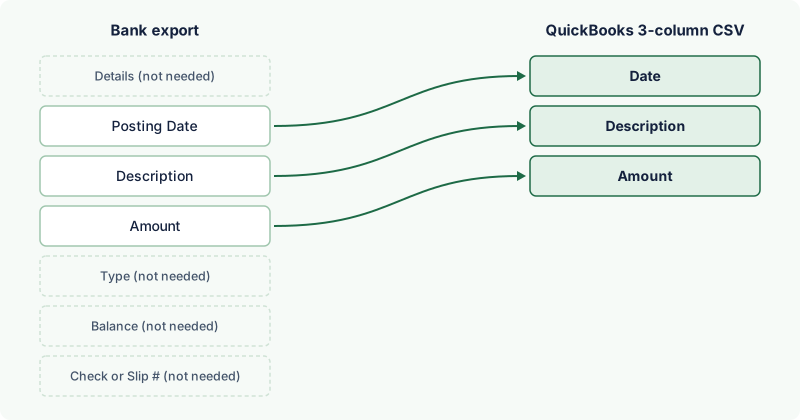
QuickBooks Online accepts CSV files in exactly two layouts:
| Layout | Columns, in this order |
|---|---|
| 3 columns | Date, Description, Amount (money out negative) |
| 4 columns | Date, Description, Credit, Debit (money out in the Debit column) |
Bank CSVs almost never arrive like this. They include balance columns, account numbers, transaction types, summary rows at the top and sometimes no header at all. You have two options:
Option A — convert it automatically. Drop the file on our bank statement to QuickBooks converter. It finds the right columns, fixes the dates and signs, and gives you a 3-column CSV, 4-column CSV or QBO file. Your file is processed in your browser and isn't uploaded.
Option B — fix it by hand in Excel or Google Sheets.
- Delete any rows above the column headings (account summaries, titles, blank rows).
- Delete every column except date, description and amount (or credit and debit).
- Put the columns in the order shown above and rename the headings to match.
- Make sure every date uses the same format, with no day names or times attached.
- For a 3-column file, make sure money out is negative. If your bank has separate debit and credit columns, either keep them (4-column layout) or combine them with a formula such as
=D2-C2. - Clear any cells that contain 0 in the Credit or Debit columns — they should be empty.
- Save as CSV (Comma delimited). On a Mac, choose Windows Comma Separated if offered.
Step 3: Upload the file to QuickBooks Online
- In QuickBooks Online, open Transactions → Bank transactions. (In some layouts this is under Banking or Bookkeeping.)
- Select Upload transactions. If you don't see it, open the arrow next to Link account and choose Upload from file.
- Choose your file and select Continue.
- Pick the QuickBooks account the transactions belong to. For a credit card file, choose the credit card account — not a bank account.
- For a CSV, QuickBooks shows a mapping screen. Match Date, Description and Amount (or Credit and Debit), choose the date format that matches your file, and tell QuickBooks whether positive numbers are money in or money out.
- Select the transactions to import and confirm.

Step 4: Review and categorise
Imported transactions land in the For review tab, exactly like bank feed transactions. Categorise them, match them to existing invoices and bills, or let your bank rules handle them. Before you finish, compare the ending balance in QuickBooks with your bank statement for the same date. If they match, the import is complete.
Common problems
- "The file you uploaded isn't in the right format." Usually extra columns, a summary row at the top, or mixed date formats. Converting the file with a tool fixes all three.
- Every amount is backwards. You told QuickBooks the wrong sign convention on the mapping screen, or imported a card file into a bank account.
- Some dates are wrong (for example, 3 February instead of 2 March). The file uses day-first dates and QuickBooks read them as month-first, or the other way round. Choose the matching date format during mapping.
- The upload is rejected because of its size. Split the export into smaller date ranges.
For more fixes, see QuickBooks bank upload errors and how to fix them.